
I know. I really need to get on with establishing the rest of the landscape.
But occasionally just putting a couple of engines and coaches on the tracks give a preview of what will eventually be. It’s a carrot.
So currently I’m still working on the western aspect of the Boltorr to Bolt Tor tunnel transition.
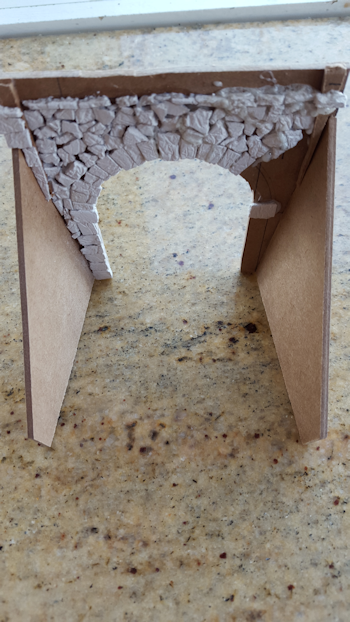
The Bolt Tor tunnel portal – 2mm MDF and DAS clay chips
The “stones” were formed by rolling DAS air-curing clay to about 1mm thickness onto a piece of non-stick aluminium foil. I previously screwed the foil into a concentrated ball and then carefully unfolded and levelled the sheet. I did this two or three times in order to generate a surface which could represent the texture of rough-hewn granite blocks.
Once the clay cured – this took a couple of days – I started to break the resultant sheet into small chips, trying to keep the size at around 4mm-6mm pieces. I used a pair of snips to cut more dressed stones for the arch, pillars and coping stones.
Another work in progress …
Then it’s a question of setting random chips of clay, however they will go, to fill in the gaps. The PVA dissolves the edges of the clay a little so placing the chips snuggly is a simple technique.
The “history” of this portal means that, hopefully, the result looks like it’s in the vernacular – rough but functional masonry. Frankly, the thought of building the Boltorr Reservoir and other masonry using this method is rather formidable. Fortunately, the history of the railway in this area means that later structures were built with good old Victorian stone masons, not a bunch of French prisoners of the Napoleonic wars, so I’ll be using textured styrene sheet.
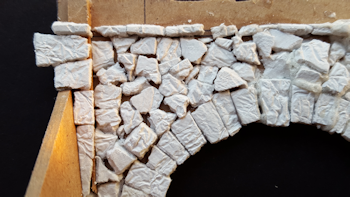
Apart from the portal, I’ve done a little work on the embankment. There’s a drainage run-off from the tunnel which drops down the base of the embankment. It might not meet with the approval of railway civil engineers, but the tunnel pre-dates the railway by fifty years … and, of course, it’s my world, right?
I traced the course of the drain by dripping diluted PVA down the slope towards the Boltorr Brook, sprinkling a little grey and brown gritty texture to define the line. I’ll be applying some longer grass and plant fibres to give a boundary for the water and, when I get around to eventually rendering the water in the Brook, I’ll use any excess to represent the water running down the run-off.
And here it is … A pannier tank and auto-trailer combination on the embankment, having just dropped down from the high point of the Boltorr branch, through the tunnel, having emerged into the daylight.
I’m considering getting another auto-trailer so I can make up a “sandwich” train which was a common setup on the branch-lines around Plymouth.
‘Til next time … tootle-pip!
So far, so good … ignore the white of the uncured PVA … we’re getting there