Just an update at Boltorr Road Halt

The actual lay of the land has changed a little at Boltorr Road.

I know this should take aeons, but it’s my universe so get used to it.

So, no track alignment changes, but the Boltorr Brook’s changed its course a little.

Now the Boltorr Reservoir Dam is under construction I’ll be able to consider the lay of the land east of the tracks soon. Construction of the bridge abutments is just starting on the Boltorr Brook’s railway bridge. Soon I’ll have to consider how to best represent moving water. Any ideas?

River re-aligned. Track pretty much the same

River re-aligned. Track pretty much the same

Posted in Boltorr Road Halt, Modelling, Railways | Tagged , , , | Leave a comment

À court de mots

Brussels - 20160322

Posted in Uncategorized | Tagged | Leave a comment

Boltorr Brook Bridge in situ

There’s this thing about building your own railway.

1: There’s a lot to do
&
2: It’s only you who can do it

When I started this project I knew it wasn’t going to be up and running by April.

April 2018 maybe.

I’ve looked at it as a three year project. Hopefully trains will be running on it way before then. I’m thinking that this April may be possible for the track work to, um, work.

Establishing Boltorr Bridge is the last job that has to be done before the track can be laid.

The bridge set in the gap with test track running over. I've had to butcher the embankment a little to leave room for the bridge abutment and retaining walls. It'll heal ...

The bridge set in the gap with test track running over. I’ve had to butcher the embankment a little to leave room for the bridge abutment and retaining walls. It’ll heal …

I made the space for the bridge by laying the baseboard material, Homasote – a bit like SunDeala, across the gap so that both sides would be spot on. I then cut the board and fitted the bridge into the gap, spending a little time making sure the track would run level from the track bed, over the bridge, and onto Boltorr Road as smoothly as possible.

The bridge is actually going to function as a bridge and needs to look as if its foundations run to the centre of the earth. I’ve had to cut back the line of the embankment a bit to fit in some reasonable retaining walls and the bridge abutment.

I’d completed a little landscaping and planting in that area, but it was really done as a practice run. One thing I learned is that it won’t be a difficult job to blend it back in.

Top view of bridge looking down to river below. Much of the ironwork is going to stay open

Top view of bridge looking down to river below. Much of the ironwork is going to stay open

The actual track transition from ballast to bridge will be disguised by a wooden walkway on the western side – towards the observer. It looks as if I’ll need to build a handrail to stop permanent way workers going over the side of the bridge. Otherwise the structure will be left open with the river visible down through the ironwork.

Once the track is finally in place I’ll be installing checkrails over the bridge and the inside one will continue around the left-hand curve towards Boltorr which is the tightest radius in view. It should still be about the tightest curve a mainline engine would normally negotiate at about 15mph. But it would have just come out of a tunnel and be approaching a small station, so it shouldn’t look out of place.

I need to get the abutments in before fixing the bridge and track in place so I’m just going to extend the river back a few more inches so I can get a good foundation for them.

That’s enough about bridges for quite a while, I hope.

Along the track and over the bridge towards Boltorr

Along the track and over the bridge towards Boltorr

Posted in Boltorr Road Halt, Modelling, Railways | Tagged , , , , , | Leave a comment

Well, There’s Theory … And Then There’s Practice – Boltorr Bridge

I sort of want to delete the previous blog posting. Things didn’t turn out as I intended.

Why?

I’m modelling in OO “gauge“. Not “scale“. That’s another thing. Don’t even go down the HO route. Hey, we’re British. Not as exceptional as some, but the rest of the world uses HO. But who cares?

There is a reason British outline railway modellers model in OO gauge. But it’s complicated and it’s a compromise and I’m not going to go into that labyrinth here.

But, so as it happens OO gauge settled on an actual modelling size ratio of 1:76.2. Yes … that’s right. Seventy six point two. A consequence of plucking a strange hybrid formula from the dark, satanic British air – 4 mm represents 1 foot. A bizarre combination of rationalism and imperialism. What could go wrong?

So where does that leave Boltorr Bridge? An HO model plonked into an OO situation. Actually, size-wise, it looks pretty good. I mean, a 1:87 artefact in a 1:76.2 world. It looks authentic enough. US loading gauge is far bigger, an HO model is a bit smaller. It all works out.

However, yesterday, I spent a good couple of hours trying to make my Boltorr Bridge model look as if it had spent a good few years transporting trains over the ancient Boltorr Brook, and suffering the slings and arrows of outrageous fortune, and not look as if it were made of Lego or straight out of the box.

The "perceived aerodynamic" Ford Sierra

The “perceived aerodynamic” Ford Sierra

Objectively, I did a great job. But, and thank you for reading this far, where is this all this going?

This morning I went to check how my artisan-crafted and weathered bridge looked after letting a final matt clear coat dry all night.

Truth is, it looked fabulous, authentic, real even… From about six inches away.

But from three feet away it looked featureless.

I don’t know if the clear coat had cut back the effects I’d worked hard on or stuff just faded overnight or I was just being realistic.

Getting back to six inches away, it was still fabulous, but any further and it looked as if I had been wasting my time.

Now, there is a known colour rendering effect when representing, and photographing model sets in that colours have to be toned back either in the set itself or using something like PhotoShop to manipulate the images otherwise things begin to look like early Technicolor movies.

More knowledgeable people than me will be able to tell you why this is so, but my theory is, if my eyeballs were 1:76.2 smaller and the wavelength of light were shorter by a similar ratio, then maybe we would see stuff as those model people would see stuff? Probably not … but you get my point?

A few paragraphs back there is an image of a European Ford Sierra from the 70s/80s. It looks like the sort of thing Dan Dare, Pilot of the Future, might have driven, Sleek, aero, futuristic, etc.

The thing is, in the entire course of its design stages, it never went near a wind tunnel. The Ford developers actually stated it was designed with “perceived aerodynamics“. It just had to look like it was aerodynamic.

Now, one of the fundamental directives of Boltorr Road Halt is to look like it’s real, authentic. It is starting to seem to me that the layout has to employ some sort of “perceived reality” factor. Absolute fidelity doesn’t actually look real. A bit like preferring music playing through a valve amplifier or seeing more truth in a French impressionist painting than a photograph.

So on my little bridge I’ve amped up the rust and the weather, more, I hope, in an “Oscar for best make-up” as opposed to greasepaint on a clown’s face sort of way.

In this quest I’ve upped the weathering game on the little plate bridge and the results are shown below. I’ve acually treated one side more aggressively than the other and I’ll finally decide which side will be seen by viewers when I set the bridge in the scene. Anyone who ventures around the back of the layout and tells me one side of the bridge is about ten years older than the other will cease to be my fb friend.

Too much? Let's see how it goes ...

Too much? Let’s see how it goes …

Posted in Blah! Blah!, Boltorr Road Halt, Modelling, Railways | Tagged , , | Leave a comment

Bridge over the Boltorr Brook

Living in the land of HO rather than OO doesn’t provide much local opportunity for finding a UK outline kit in your local model railroad store.

ME - Micro Engineering Company 50ft Thru Girder Single Track Bridge kit - 43ft in OO money

ME – Micro Engineering Company 50ft Thru Girder Single Track Bridge kit – 43ft in OO money

Fortunately, when it comes to structures like a steel plate bridge on a railway line which is not much more than a figment of my imagination, who is to say exactly how big a bridge is and whether an HO structure is too small for an OO layout?

Not me, that’s for sure.

So a little bridge destined to transport Casey Jones across a tributary of the mighty Mississippi fitted in just right on my little piece of Dartmoor in the USA.

I made the kit up on a plate of glass for levels. It fitted together pretty well although a few bits needed filing and a fair amount of flash had to be removed as well.

I’ve augmented the structure with a couple of extra I-beams so, hopefully, it will look as if it could support the occasional Westcountry light pacific when the Waterloo Boat Train needs diverting around Tavistock.

First coat of flat matt paint went on well, although the model appears to have very little depth or variation of tone

First coat of flat matt paint went on well, although the model appears to have very little depth or variation of tone

Once finished and all the solvent and glue was set, I washed the entire bridge in soapy water, rinsed it well and left it to dry overnight. This was to rid it of fingerprints and any mould release agent.

White weathering powder - yes it's subtle - it's more obvious to the naked eye than the camera

White weathering powder – yes it’s subtle – it’s more obvious to the naked eye than the camera

I then applied a coat of matt black paint. This was done in several stages to make sure there was a good even covering. I left this to dry overnight. The coverage was very good, but the effect was very flat and the bridge needed some character.

Firstly, I dry brushed some white weathering powder over the bridge. Actually I sprayed some “wet water” first to give the powder something to hold on to. This gave definition to the details of the bridge, especially the plate joins and rivets.

With these weathering powders it’s truly a case of less is more. The pigments are concentrated so you really need very little. Once again it was better to apply a couple of light coatings than plaster it on. Each application was finished by dry brushing it the direction you would expect any weather marks to go, in this case, vertically downwards.

It's hard to tell from an image, but there's enough corrosion to represent a well maintained bridge in a hostile environment - Dartmoor

It’s hard to tell from an image, but there’s enough corrosion to represent a well maintained bridge in a hostile environment – Dartmoor

Then it was time for a hint of corrosion. I used a rust coloured paint for concentrated spots and softened it out with rust-coloured weathering powder. The mantra is always, “less is more“. Having said that I might have overdid the rust, but a dusting of black “grime” powder brought it back to reality. In fact, it turned out well, because it kind of looks as if the original red oxide paint and any other rusty stuff is weathering from under the black paint layer.

You really can use any old brushes for this. My basic dry brushing tool was from a bundle of about 20 for five bucks at Michaels, although I could probably have saved money by buying them at the Dollar Store.

However, I use a tiny, artist’s quality brush for detailing where necessary. But the best brush of all is a giant make-up application brush donated by Mrs Bloke – she does know, honest. As the powders dry, just keep gently brushing until it looks right.

The thing is, it’s basically all simple technique, not artistic talent. Just work in very small steps. Don’t worry if you don’t see much happening for a couple of applications, and just brush it back if you go too far.

Awaiting a final transparent matt finish to hold the weathering powders in place. The track base has to be accurately marked out  and cut to set the bridge, then time to place the abutments, track and platewaymen's board walk

Awaiting a final transparent matt finish to hold the weathering powders in place. The track base has to be accurately marked out and cut to set the bridge, then time to place the abutments, track and platewaymen’s board walk

Posted in Boltorr Road Halt, Modelling, Railways | Tagged , , , , , , | Leave a comment

New Header for That British Bloke

I thought it was time for a new look at the otbb blog.

I’ve kept the text elements the same, but merged in a view of my model railway, the Boltorr Road Halt.

The shot is comprised of an ex-GWR auto-trailer, in BR crimson, being pushed onto the embankment approach to the platform by an ex-GWR 6417 0-6-0 on a local up from Plymouth. Both models are out of the box and set on the only bit of the layout which has had any scenic treatment.

newheader

Posted in Bloggy, Boltorr Road Halt, Court & Social, Modelling, Railways | Leave a comment

HiFi : The Digital Line

HiFi

Now there’s a word you don’t see or hear that often these days of listening to highly compressed music squirted through cheap ear-buds from your phone for your ears only.

Another day I’ll reminisce about when we used coats for goalposts and went round other people’s places to spin the latest disc with fellow music lovers. By disc I mean those big, black groovy things which crackled and popped, although probably not as much as we tend to remember.

Anyway, that’s analogue and the topic of a future article in the story of my hifi.

Today, the bulk of my music is in a digital format and stored on a couple of network servers here at ChezNousSurMer. Two servers for redundancy, and a regular routine backs up to “the cloud” in case of some domestic disaster, tsunami, or whatever.

I get my music files from a couple of sources, online and ripped from CDs.

qobuz.com - other online retailers are available

qobuz.com – other online retailers are available

My goto online purveyor is qobuz.com, a French company which clings tenuously to existence, but supplies music in virtually any digital format.

Exact Audio Copy - EAC - requires extensive set up for best results. But the results are very good

Exact Audio Copy – EAC – requires extensive set up for best results. But the results are very good

I almost always use .flac, a lossless file format, for all my music. The unfortunately ubiquitous .mp3 format compresses the music file, a little like a .jpeg graphic file, and in the end the quality of the sound suffers audio artefacts just as images do when they’re compressed. qobuz also provides some music in high definition and other studio quality formats which I tend to use for instrument based music, although not for electronic type genres.

dbPowerAmp CD Ripper - I can't hear or measure any difference with EAC

dbPowerAmp CD Ripper – I can’t hear or measure any difference with EAC

I still buy CDs, but I rip them into a file format using either Exact Audio Copy – EAC – or dbPowerAmp CD Ripper.

mp3tag enables bulk and individual editing of "tags"

mp3tag enables bulk and individual editing of “tags”

Both applications deliver almost any audio format you could want. Both check the source files and the computer transport used against various databases to ensure any idiosyncrasies are factored out and as perfect a copy of the music as possible is delivered.

Tags are a very important aspect of an audio file. Good tagging enables accurate cataloguing of all your music files – I currently have around 60,000 files – and consequently finding just what you want, when you want it. mp3tag is my goto for checking and editing tags and adding stuff like album art, etc.

I don’t tend to use tags like “Genre” or “Year“. Genre doesn’t work for me. I once told my dad there were two genres of music, “Good” and “Bad“. He told me I was wrong. “There’s music you like and music you don’t like.

Since I don’t possess any – or at least not much – music I don’t like, there is no need for “Genre“.

Once all music is ripped or delivered, and tags checked and edited it’s time to add to the network file server – NAS, backup and catalogue.

Everyone will have their own way of accomplishing this, so I won’t detail it, but GoodSync is very useful and works with GoogleDrive.

MediaMonkey - controls  and delivers my music library

MediaMonkey – controls and delivers my music library

However, my music library is catalogued and delivered using MusicMonkey. I have no doubt there is better, but MM is the one I’ve grown up with.

It is possible to set MM to provide a higher degree of fidelity, but I’ve found that that the optimum setup won’t play gapless. So when you’re playing “Dark Side Of The Moon“, there’s an irritating moment of silence between tracks. To avoid this I’ve taken the settings a step back from the very highest fidelity, but frankly, I can’t hear the difference at all. Okay, so if you have Golden Ears – an unproven concept – you might claim to be able to discern and if you can prove it there’s a million dollar prize on offer … But I can’t. So there.

The function of actually rendering digital files is a function of delivery, input codecs, rendering and output codecs, DA conversion, etc. Don’t mention cables.

That’s a story for another day – The Input Line – sources.

Posted in Hifi, Techie | Tagged , , , , , , , , , , , , , , , , | Leave a comment

Bolt Tor Tunnel Portal

The basic model - 2mm MDF and DAS clay chips

The basic model – 2mm MDF and DAS clay chips

I’m pretty sure that the rest of the granite structures on Boltorr Road will not be made in this manner.

Manufacturing and applying hundreds, if not thousands of clay chips to represent rough hewn granite blocks certainly gives a very nice authentic appearance.

But frankly, covering possibly hundreds of square inches in this manner would pretty much define my spare time for the foreseeable future.

So the rest of the major structures on the layout – the reservoir dam, the rail bridge and Boltorr road over-bridge, will be built using plastic card embossed with a more dressed stone pattern.

First coat dark grey acrylic

First coat dark grey acrylic

Since the Bolt Tor tunnel was originally built by French prisoners from the Napoleonic wars for the plateway used in the construction of the reservoir about fifty years before the railway commandeered it, it can look a bit rough.

The more modern features will look as if they were built by skilled Victorian masons.

Anyway, that’s my excuse.

The basic structure was fabricated from 2mm MDF and random pieces of very thin chip made from DAS clay.

Thin dilute wash of off-white acrylic to define mortar and give some tonal variation. The darker area over the portal is where the train smoke stains the stones

Thin dilute wash of off-white acrylic to define mortar and give some tonal variation. The darker area over the portal is where the train smoke stains the stones

The clay was rolled out to about 1mm thick onto non-stick aluminium foil which previously had be scrunched up and carefully unfolded several times to give a textured surface. This was left to dry/cure, for me, around 48 hours.

The layers of very thin clay was then broken into appropriately sized chips to represent individual granite blocks. Dressed stones required on the arch and elsewhere were cut out with a pair of side snips.

The individual blocks were applied by spreading a thin layer of PVA glue onto the surface of the MDF, about an inch square at a time. The PVA causes the edges of the clay chips to become a little softened so it’s easy to get blocks to cosy up to each other in quite a realistic way, using a pair of tweezers to position the chips.

Individual stones picked out in various granite tones

Individual stones picked out in various granite tones

Once again the model took a couple of days to completely dry out so that a rough coat of dark grey acrylic paint can be applied. You can just dab the paint on since you are looking for a natural variation. You really can’t mess up to the degree that needs undoing at any point in the painting of the stones.

Once again, let the model completely dry out. Believe me, the MDF and clay soaks up a lot of liquid which takes many hours to dry.

I represented mortar and other general weathering and variation by thoroughly mixing up a small batch of whitish acrylic paint – 1 part paint / 2 part water + 1 drop of dish soap / washing-up-liquid – in a small dropper bottle.

To treat a surface I laid it horizontally on the bench and just dripped the wash onto the surface and let it soak in and dry. I repeated this process a couple of times on each surface until I got the result I wanted.

"Eye level" view of portal with some weathering and ready for locating on layout

“Eye level” view of portal with some weathering and ready for locating on layout

Once this was all dry – another couple of days – I picked out some random blocks and used a tiny paint brush and some black and white paint on a palette to give some more variation to the surface of the blocks.

It might have been better to have done this during the adding “mortar” stage, but it seemed to blend in with a bit of buffing with a dry, stiff brush.

The portal is now at the point where I can fit it onto the layout and blend in the landscape around it. It needs a little more weathering work, water and mineral stains, and once in situ a couple of plants/ferns growing in niches to add a little more detail.

Anyway. If I can do it, so can you.

Posted in Boltorr Road Halt, Modelling, Railways | Tagged , , , , , , | Leave a comment

Sansui AU-317 MkII Integrated Amplifier

Article about the Sansui AU317 MkII on Blogspot

Article about the Sansui AU317 MkII on Blogspot

For some reason, this article written some years ago now, elicits the largest number of Google referrals to this blog.

The actual article itself is still available on BlogSpot.

Here to be precise.

The link to Sansui’s sales brochure still works …

I hope this is helpful to all those vintage hifi aficionados out there.

Posted in Hifi | Tagged , , , | Leave a comment

March on Manhattan

A 70F/21C day in Manhattan in March was too good an opportunity to miss, so my fellow Bromptoneer, Steve, and I met up at NYPenn station and set off for a leisurely tour of the west side of the Big Apple.

The nice thing about riding a Brompton around the city is that there’s no real incentive to hammer around. Naturally we took every opportunity to study the view, talk about geology and history and that sort of stuff.

The Brompton brothers pause on the Greenway. It was a hazy day ...

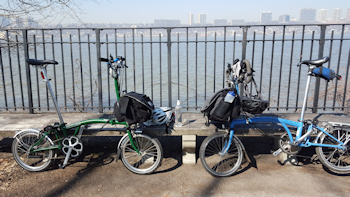
The Brompton brothers pause on the Greenway. It was a hazy day …

So it’s not all about the bike although Bromptons never fail to elicit comments from other cyclists and passers-by and, indeed, other Bromptoneers. A consequence of the number of options – colour combinations, equipment, customisations, etc – means you’re rarely going to come across your own bike’s doppelgänger.

After grabbing a quick sandwich at Pret a Manger, which while tasty enough is about as French as a British company with branches in an American train station can make a sandwich, we cut across the the west side Greenway cycle path through some fairly massive construction being developed over the Penn station yards. Until recently passengers were able to see daylight after emerging from the Hudson rail tunnels and before entering the Stygian gloom of NYPenn station.

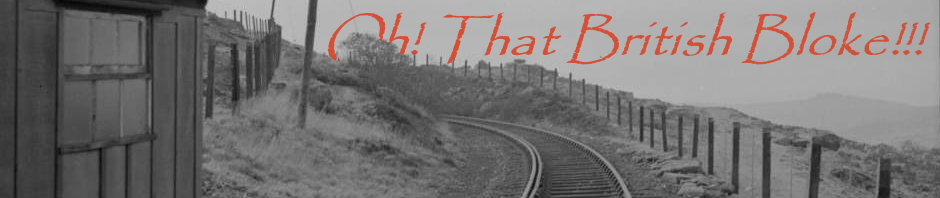
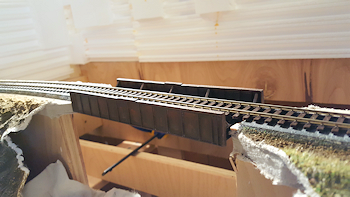
Now there’s a huge building in the process of construction over the tracks with truly massive steelwork much of which looks riveted if not actually bolted together. Elements are being hoisted into place from a forest of cranes on the top.

The Little Red Lighthouse at Jeffrey's Hook - right under the GWB

The Little Red Lighthouse at Jeffrey’s Hook – right under the GWB

Heading north our target was to be the George Washington Bridge – GWB, possibly the busiest bridge in the world. The sun was really nice and warm, although the shadows where the path runs under the West Side highway kept the air there pretty chilly.

The light house under the GWB turns out to be a famous literary landmark. The Little Red Lighthouse is a book familiar to Americans, although honestly, I’d never heard of it.

When originally built on Jeffrey’s Point on the Hudson it shone a light of ten candlepower. Now there’s no real conversion between candlepower and lumens, but I can’t help thinking that 10 candle isn’t much, although I imagine nights on the Hudson were much darker then.

It was then time to bite the bullet and head further north to climb up the GWB.

I’ve descended the Greenway at this point on many occasions, but the ascent is really steep. My creaky winter knees eventually gave up on the final section. But heck! Walking up is still doing the work, right?

Access to the bridge’s cycle-path was typically cycle-pathy – ill-signposted, convoluted and really rather unpleasant. Having eventually found the ramp for the path we headed out onto the span. At this point the path is barely wide enough to accommodate two sets of handlebars so you can only hope that riders coming at you are as competent as you are.

Brian pausing to admire the view. I can't believe those railings are only that high ...

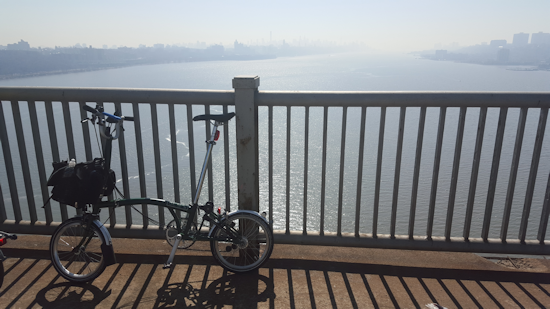
Brian pausing to admire the view. I can’t believe those railings are only that high …

The other issue is, and my apprenticeship was in shipbuilding so theoretically I know this, that bridge really moves around. I’m actually really confident on a mountain or cliff path, but when those built structures get shaking, I sweat a little.

But, hey ho! Off we go …

We actually made it into New Jersey, contemplated Chris Christie’s current headaches, sympathised – not really – and admired the prospect into the Garden State and found it wanting, tried to find a traffic cone then headed back towards NYC.

Getting back onto the Greenway turned out to be more problematic than we anticipated. There’s a lot of work going on there, which is admirable, but it’s very poorly signposted and we had a couple of useless detours before getting back down to river level.

A nice cup of tea in Central Park beckoned so we cut across and eventually settled on the Tavern on the Green, but of course the coffee shop was closed but we settled for a beer with an old friend of Steve’s who happened to be an archbishop. Okay, so I’m not really sure about that, but who knows?

Now I delved deep into the pockets of my fixie rider’s jeans and dug out a couple a couple of unused “The Standard” beer tickets. They were green.

So we headed south another sixty or so blocks in the hope it was a green ticket day. And it was! And the nice young woman behind the bar took the tickets and we got another beer. Phew!

All right, maybe every day is a green ticket at “The Standard“, but the beer was good.

Time for the train.

The Hudson - looking south from Jeffrey's Point

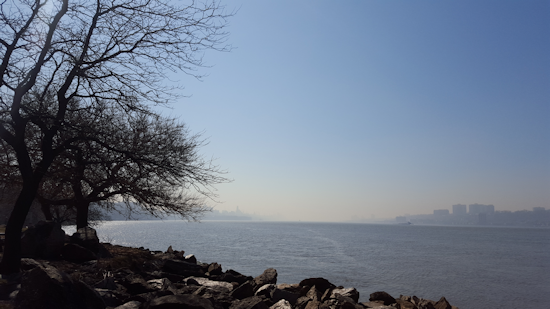
The Hudson – looking south from Jeffrey’s Point

Posted in Bicycles, Court & Social | Tagged , , , , , , , , , , | Leave a comment